¶ Forward
The purpose of the ACTD is to provide vCSG-8 with an internal tactics, training, and procedures doctrine (TTP) that is not reliant on references to third-party or real life materials. This TTP will encompass basic fighter maneuvers, tactical formation, air combat maneuvers, air intercept control, and tactical intercept.
¶ Tactical Formation
¶ Element Formation
¶ Flight Formation
¶ Formation Communication
¶ Basic Fighter Maneuvers (BFM)
Mike Solyom on youtube has a very educational playlist for BFM. Many concepts and images in the following lessons are derived from those videos, the F-4E MiG Killers campaign, the F-14 Speed and Angels campaign, and the RoKAF Basic Employment Manual for the F-16C.
Remember, lose sight, lose the fight. If you lose sight, continue turning and assume the enemy fighter is likely still tally and fighting to end up in your rear quarter. Look for him there.
¶ BFM Concepts
¶ Pursuit
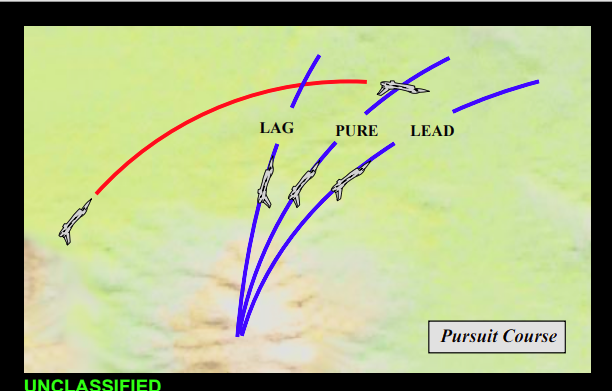
Rendition of pipper in relation to bandit for all three pursuits
¶ Pure Pursuit
- Nose on bandit
¶ Lead Pursuit
- Nose ahead of bandit
- Generally required for weapons employment
¶ Lag Pursuit
- Nose behind Bandit
¶ The Merge
The Merge is the term for when fighters have entered the BFM arena, with the brevity code MERGED representing this from the AIC position. This term represents the fact the radar contacts from both flights/fighters are now on top of each other and indistinguishable
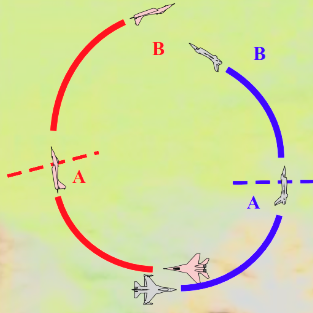
¶ Turning Circles

Turning circles renditioned
Knowing the advantages of your aircraft and your bandit’s aircraft are crucial. If your bandit has a better sustained turn radius, they will prefer a One Circle fight. If your bandit has a better maximum sustained turn rate, they will prefer a 2 circle fight. Do not fight the fight the bandit wants.
¶ One Circle
The fighters turn opposite directions post merge (One fighter turns left, one turns right). This fight is a radius fight. The aircraft with the smaller turn radius WILL win this fight. It is also easily identified by a nose to nose alignment between the two fighters. This fight will always end in another merge. If the fighter is winning, they should employ a lead turn to establish turning room to reverse the turn and get behind the bandit. With the bandit defending, this will likely end in a scissors that the fighter will begin winning.
Winning Cues
¶ Two Circle
The fighters turn into each other post merge. This fight is a rate fight. The aircraft with the high maximum sustained turn rate will win this fight. It is also easily identified by a nose to tail alignment between the two fighters. When the bandit is in specific parameters (depicted below), the fighter should execute a turn circle extension to align turning circles with the bandit and continue the rate fight. Multiple extensions may be necessary to win the fight.
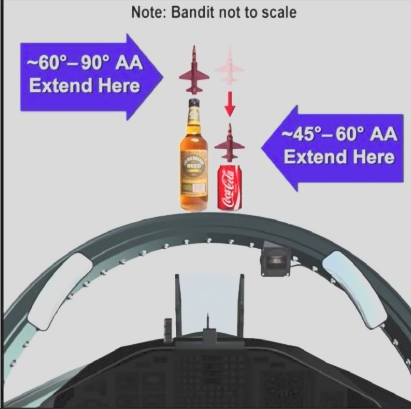
Turn Circle Extension Cues. Note, the distance above canopy bow can be roughly equated to a full mirrors distance and a half mirrors distance for the bottle of Jeremiah Weed and soda can, respectively
Winning Cues
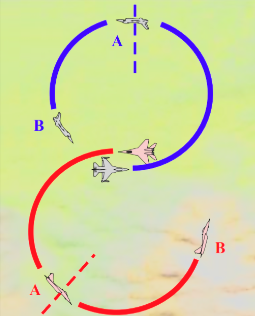
¶ Using the Vertical
EM diagrams do a good job of showing the effect of the vertical on your energy state. Descending at specific rates while in a turn allow the aircraft to sustain higher rates of turn at higher G, while ascending has the opposite effect.
Purely vertical turns are a unique case in the BFM arena.
- Purely upwards vertical maneuvers exposes a fighter to a missile or guns shot as they approach the top of the turn.
- Purely downwards vertical maneuvers are executed when a fighter believes the bandit has made an error in their turn circle entry. Without this error, it is very dangerous to execute.
Defending against the purely vertical is fairly simple
- Against a purely upwards vertical maneuver, identify if you will be able to achieve a missile or guns solution as the bandit approach the beginning of the pull through the top of the circle. If you can, execute best possible maneuvers to achieve this. Otherwise, follow the bandit into the vertical, pulling lead on the way up, and lag on the way down. Pulling lead for a shot in the downslope can very easily lead to an overshoot.
- Against a purely downwards vertical maneuver, make best turn radius to get to where the bandit started their dive. He will slowly slide to your 3/9 line, then slice back down into him. Lag in the downslope, lead in the upslope. If the bandit pulls into the vertical, kill him there. If he pulls to the horizontal plane, continue the fight as it appears.
¶ Reversals
“Reversals are turns at an opportune time in an opportune direction” -Mike Solyom
Reversals can either allow a defensive fighter to become offensive, or get them killed. These opportunities to turn a fight around are exceedingly rare and should only be permitted with 100% confidence that the maneuver will work. Any doubt, do NOT execute the maneuver. More often than not, a successful reversal will simply make the fight neutral.
Reversal opportunities are identified when the bandit is RAPIDLY moving laterally along the canopy glass to the aft of the aircraft. Should the bandit arrest this error, the maneuver WILL NOT WORK and the defensive fighter may end up in a worse position than they were previously.
When an opportunity is apparent, immediately unload, reverse your turn, and execute an out of plane maneuver, then immediately maneuver to fight the bandit. If it goes well, the bandit should be in a neutral position out the top of the canopy glass or out front. Most times, this will end in a neutral scissors fight.
¶ Rate Defense
A rate defense is one in which the defensive fighter maintains a maximum sustained turn rate to defend against an opponent and extend range to deny a kill. This defense is largely obsolete in modern scenarios, where this will likely give up the rear quarter for an advanced longer range FOX 2 kill.
¶ Radius Defense
A radius defense is one in which the defensive fighter maintains the smallest sustainable turn radius to defend against an opponent and keep them close to deny a kill. This is largely the defense necessary in the modern setting, as longer range missiles have rendered extending away lethal, and staying inside the MEZ of missiles and denying gun kills has become the only way to survive.
¶ Aerial Gunnery
Fighters employing weapons will likely transition from a lag pursuit, to pure pursuit, to a lead pursuit. Identifying this is crucial for employing defensive maneuvers to defeat bandit gunnery. Moreover, defending the rear quarter is CRUCIAL to survival. Flares will likely not assist a defense in this quarter. Endeavour to make the bandits life as hard as possible when they attempt to gain a guns kill, and defend the rear quarter to deny easy missile kills.
For offensive fighters, using lag to position themselves behind the bandit for a FOX 2 kill is the ideal method for engagement, even with all aspect missiles (though the acceptable cone for employment does widen greatly with newer all aspect missiles). However, missiles may not always be available. Guns are highly capable of rapid snapshots, especially when opportunity lasts less than a second (like a high speed maneuver across the nose or forward quarter snapshots). Endeavour to match the wing attitude of the target and smoothly pull the pipper onto the target and track them for good guns employment. Trigger down for at least 1 second to ensure good coverage and effective damage on the bandit.
¶ Offensive BFM
Offensive BFM is the ideal position to be in. A fighter’s main objectives in offensive BFM are:
- Kill the bandit
- Do not crash into the ground. The ground has a Pk of 1.
- Do not get defensive
Maintaining a steady, positive closure rate is key to staying offensive and getting the kill. An offensive bandit should use all tools available to kill the bandit as fast as possible, utilizing lag pursuit and lag rolls to avoid an overshoot, and lead pursuit to gain closure on a bandit and pull lead for weapons employment.
¶ Defensive BFM
Defensive BFM is not ideal. A fighter’s main objectives in defensive BFM are:
- SURVIVE
- Defeat the initial attack
- Deny the WEZ
- Defeat subsequent weapons
- Neutralize the threat, separate from the threat, or get offensive
The longer a fighter survives, the more likely they are to receive assistance from their flight or other flights. For example, an F-5 flying a sustained rate turn will take 36 seconds to fly a full circle. A friendly fighter traveling at Mach 1 will travel 7 miles in that time. The more time a fighter is alive and creating problems for a bandit, the more fighters can get involved (including enemy ones).
To deny weapons employments, fighters have primarily 3 maneuvers:
- Tightening their turn
- Out of Plane Maneuver (unloading, rolling into a different plane so as to place the lift vector below the bandit, and rolling back and repeating as necessary)
- Jink (combining tightening the turn and out of plane maneuvers while setting throttles to idle, and pulling the stack until the aircraft aerodynamically stalls)
Jinks can bleed energy, and should likely be employed in a descent to maintain energy. They will likely end in a scissors if employed correctly.
¶ High Aspect BFM
Aspect is derived from the angle from the bandits tail, with high aspect implying nose to nose (merge) to neutral positioning.
¶ Merge Setup
Setting up a Merge is key to success in the ensuing fight. There are some key things to focus on
-
Build Turning Room (vertical or lateral)
Building turning room means building separation to ensure the fight geometry does not end in a unideal situation. This separation is very related to the stern conversion separation and fits the same purpose -
Lead Turn
A lead turn is turning prior to the pass at the merge. DO NOT WAIT TO PASS THE BANDIT. Cheat and steal every advantage you can get. Use the lead turn similar to a stern conversion turn to end up behind the bandit. Earlier is better. If you want to decide what circle fight you will partake in, you will need to forfeit this advantage. -
Speed
The USAF energy atom is the easiest depiction of what speed to use when attempting purely vertical lead turns, lateral lead turns, or a mix lead turn at the merge (when facing a 400 knot bandit). See below:
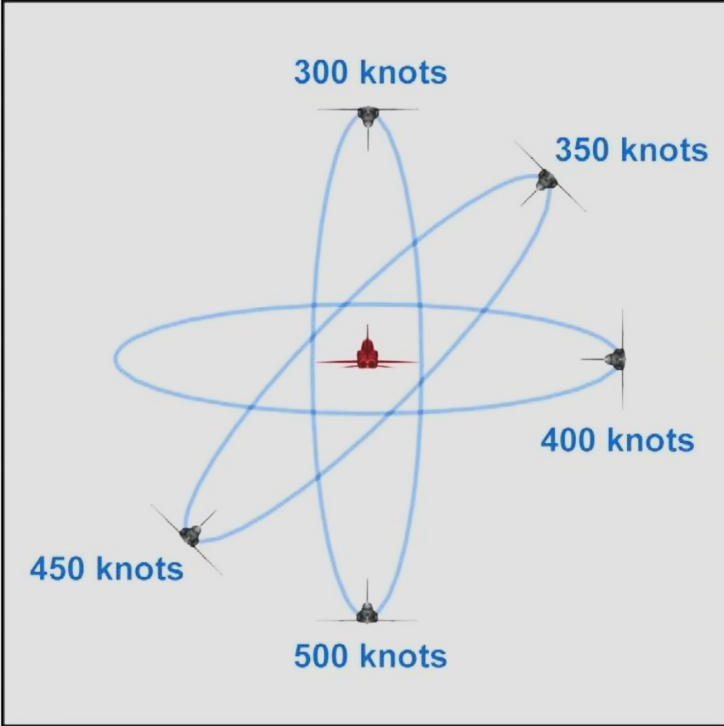
Identifying the direction the bandit will turn is also key. If your aircraft is ideal in a 2 circle fight to your bandit, endeavour to be in this fight. Fake a turn direction if necessary to force the bandit to commit to a turn, then turn to get your ideal circle fight. A low energy entrance to the merge is conducive to a one circle fight, while a high energy entrance is conducive to a two circle fight.
¶ BFM Exercises
Setup parameters are configurable as necessary
If using similar aircraft, exercise the Teacher/Student limits on the EM diagram
When running these exercises, to get the basics down, it is recommended to limit the members to rear quarter IR missiles and AIM-7s only. Afterwards, you can expand to more capable missiles and adapt tactics.
¶ Offensive BFM
¶ Offensive Perch
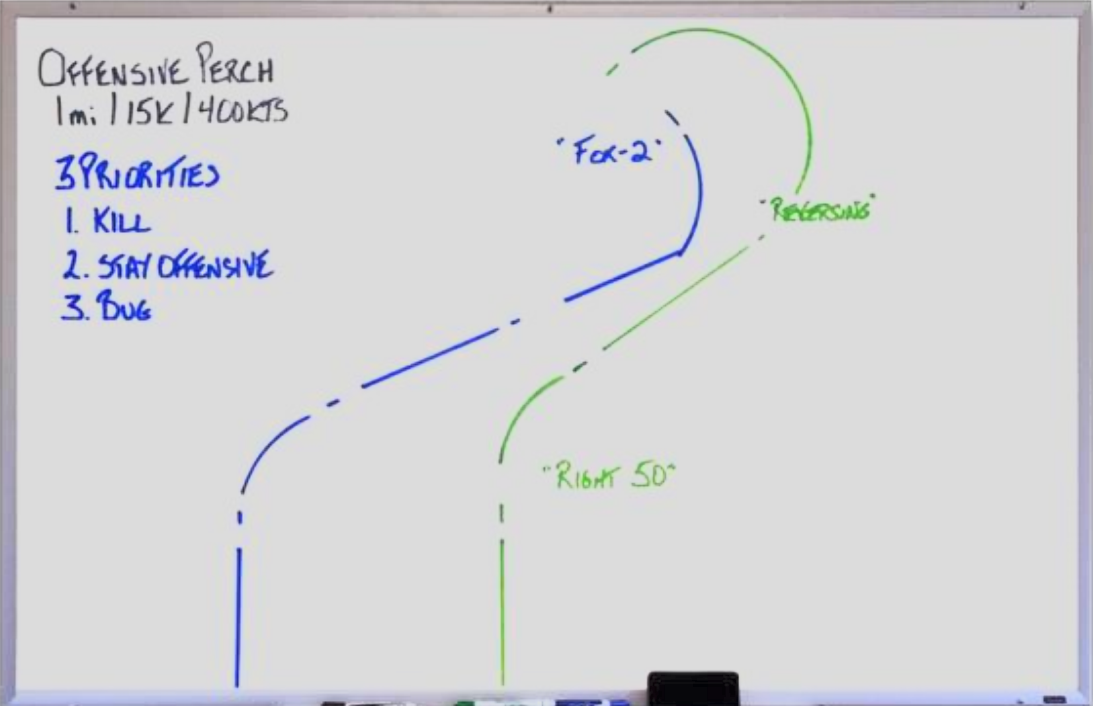
Start in spread, 15k, 400kts. Come left 50 degrees, then the bandit should reverse their turn, slowing to 365kts, and endeavour to keep the engaged fighter at their 5 to 6 o’clock. At the engaged fighters FOX 2 call at 3000 feet, FIGHT'S ON.
¶ Quarter Plane
Quarter plane is a last ditch maneuver to avoid overshooting a bandit. Start setup in the offensive perch, and when the engaged fighter is at 1000 feet, roll wings level, idle power, and execute a maximum performance pull up, then roll onto the bandit.
¶ Medium Range OBFM
Setup at the offensive perch, except the FIGHT'S ON will occur at 6000 feet.
¶ Defensive BFM
¶ Defensive Perch
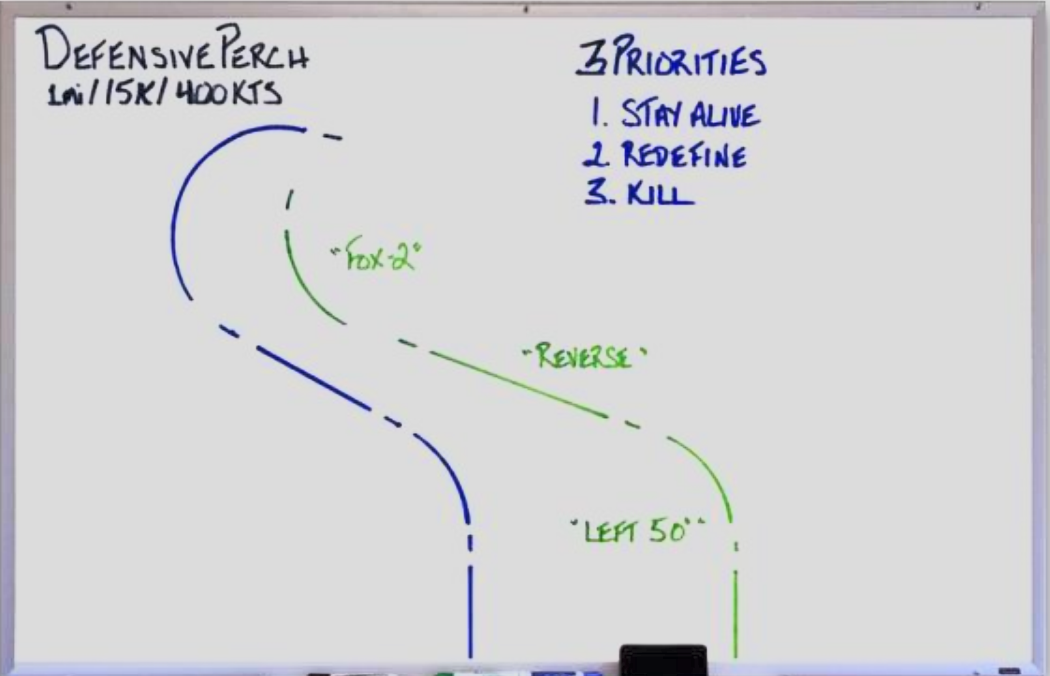
Start in spread, 15k, 400kts. Come left 50 degrees, then the defensive fighter should reverse their turn and endeavour to keep the bandit at their 5 to 6 o’clock. At the bandits FOX 2 call at 3000 feet, FIGHT'S ON.
¶ Butterfly Set
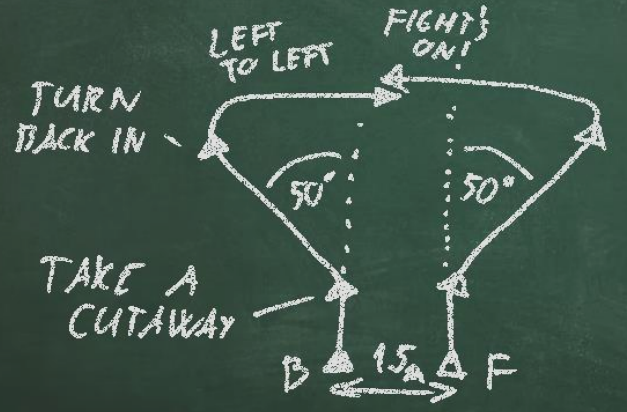
Start 1 mile abeam, 15k, 400kts. Take a 50 degree cutaway, continue for 30 seconds, then turn back in. Use this to practice general BFM.
¶ Air Combat Maneuvering (ACM)
ACM is similar to the concept of BFM, but now as a section or division fighting to kill the bandit.
Many concepts and images in the following lessons are derived from those videos, the F-4E MiG Killers campaign, the F-14 Speed and Angels campaign, and the RoKAF Basic Employment Manual for the F-16C.
¶ Merge Setup as a flight
Post BVR engagement, it is highly possible that the flight may proceed to the merge to finish off the engagement. The ideal method for going to the merge is bracketing the hostile flight. This means one half of the flight on one side of the target, the other half on the other so as to force the target to fly between the two halves and choose one to engage. This serves a few purposes:
- Forces the bandit(s) to commit to engaging one or the other, leaving the unengaged fighter(s) in an opportune position to maneuver for a kill
- Allows ease of identification of Engaged/Supporting Fighter
- Puts more decision making upon the bandit, forcing them under more stress and allowing your flight more time.
At the merge, the engaged fighter should identify if they are two-circle or one-circle and communicate this. The supporting fighter should maneuver so as to attain a prime position in which to either kill the bandit or sanitize the airspace. This in most scenarios will mean pulling into the vertical and looking for the bandit out the top of the canopy.
Remember, lose sight, lose the fight
In modern scenarios with all aspect IR missile, go to the merge pumping flares and chaff. Maintain visual on your bandit, and watch for missile launches.
¶ Equivalent Strength Merge
In cases where the flight will be merging with an equivalent number of bandits, the same bracketing principle applies when going to the merge. We will use a 2v2 example here.
With the bandit 2-ship splitting the section, they have two options. The bandits can attempt 2 separate BFM engagements OR focus on one aircraft.
A. In the instance the bandits BOTH engage a single fighter, they will be exposing their rear quarter to the free fighter. The Engaged Fighter should fly best BFM, while the supporting fighter immediately turns to engage one of the two bandits, endeavoring to kill AS SOON AS POSSIBLE. Use whatever missile can accomplish this task.
B. In the instance the bandits attempt 2 separate BFM engagements, they will be exposing their rear quarter to the fighter they are not engaging. This allows an opportunity for the friendly flight to simply turn in and engage each other’s bandits. This situation can be recognized if BOTH friendly fighters make ENGAGED calls, and should immediately maneuver to execute this tactic.
Below is an image from the F-4 MiG Killers Campaign that demonstrates these maneuvers:
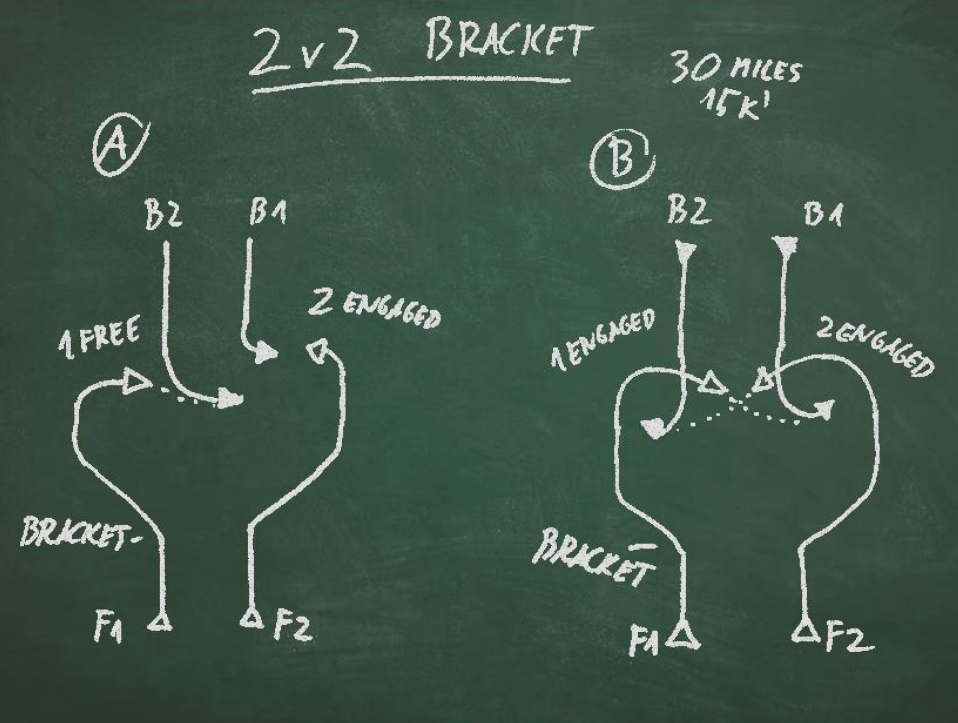
For the inevitable question for scenario B, “What if the fighters execute a cross turn to engage the section?” Simply kill your bandit as he exposes his rear quarter to you.
¶ Element Deconfliction
¶ Supporting / Engaged Fighter Roles
¶ Objectives of Offensive ACM
In an offensive engagement, speed and clarity are decisive. The following objectives apply:
- Assume roles early to prevent confusion and interference.
- Kill the hostile in the minimum time possible.
- Maintain flight situational awareness and mutual support.
- Use altitude and angles to deny the hostile visual and create favorable geometry.
- Sanitize the area and account for additional threats.
- Enable rapid role exchange when required.
¶ Objectives of Defensive ACM
In a defensive engagement, survival and lethality are inseparable. The following objectives apply:
- Detect and identify the threat early.
- Defeat the initial attack and deny follow-up shots.
- Kill the hostile at the earliest opportunity.
- Maintain flight situational awareness and mutual support.
- Apply SOP and flight contracts to avoid confusion.
¶ Threat Detection
Threat recognition is a continuous loop: Radar → Situational Awareness Display → RWR → Visual Lookout. Each fighter is responsible for their own visual scan sector:
-
Left fighter: scan left.
-
Lead: scan forward.
-
Right fighter: scan right.
-
Slot: scan primary threat vector.
-
All members must check six for each other.
-
Radar scan is per squadron/jet SOP
¶ The Engaged Fighter
The Engaged Fighter (EF) can only be one fighter at a time. The EF is the fighter currently maneuvering in relation to the bandit. The EF should make the ENGAGED call upon assumption of this role, appending OFFENSIVE or DEFENSIVE as applicable.
Responsibilities (Offensive):
- Maneuver to kill the bandit in the minimum time (fly best BFM).
- Clear the Supporting Fighter to engage if they are in a better position to employ.
- Keep the Supporting Fighter informed of intentions and plans.
Responsibilities (Defensive):
- Survive by flying the best defensive BFM and avoiding the ground.
- Maneuver to negate the bandit’s attack and create an opportunity to transition to neutral or offensive.
¶ The Supporting Fighter
The Supporting Fighter (SF) is whichever fighter is not the EF. The SF will reply with SUPPORTING. The SF has greater capacity for maneuvering and maintaining SA.
Responsibilities:
- Maintain visual on the EF/DF and strive for tally on the bandit.
- Avoid collision.
- Sanitize the area for additional threats.
- Maneuver to avoid the fight and gain a good entry on the bandit.
- Employ ordnance if the bandit is in WEZ and OF/DF safety will not be compromised.
- Use superior SA to maneuver the EF for shots of opportunity when possible.
- Engage other bandits that are a factor and keep the EF/DF informed.
- Direct egress post-kill.
Notes:
- If the bandit switches targets, the recognizing fighter should immediately call SWITCHED to signify the change.
- Roles are based on position and bandit actions, not leader/wingman assignments.
- In offensive ACM, the SF should avoid “sandwich geometry” (EF → Bandit → SF), where the EF cannot employ safely.
As a note, role assumption CAN be directive, for instance:
RIPPER31: “3,1 YOU"RE ENGAGED, IM SUPPORTING”
RIPPER33: “3, ENGAGED”
There is no right answer as to whether the call should be made directive or not, use best judgement.
¶ Role Switching
Clear and directive calls are essential. Every transition = two transmissions: one fighter declares ENGAGED/DEFENSIVE, the other confirms SUPPORTING.
Offensive switch (clear):
- EF: “RAGE 1 OFF, YOU’RE ENGAGED. BANDIT 3 O’CLOCK, 1 MILE, HOT.”
- SF: “RAGE 2 ENGAGED, RAGE 1 SUPPORTING.”
Neutral merge:
- EF: “RAGE 1 NEUTRAL.”
- SF: “RAGE 2 ENTRY HIGH RIGHT.”
- EF: “RAGE 1 CLEARED IN.”
- SF: “RAGE 2 ENGAGED, RAGE 1 SUPPORTING.”
Defensive onset:
- EF: “RAGE 1 DEFENSIVE.”
- SF: “RAGE 2 SUPPORTING.”
- If swap required:
- SF: “RAGE 2 ENGAGED, RAGE 1 SUPPORTING.”
Bandit switches target:
- Dropped fighter: “RAGE 1 SWITCHED, SUPPORTING.”
- Newly targeted fighter:
- Defensive: “RAGE 2 DEFENSIVE.”
- Offensive: “RAGE 2 ENGAGED.”
¶ Shots of Opportunity
A shot of opportunity exists when:
- The bandit is in the SF’s WEZ.
- The EF is not in the weapon’s FOV.
- Bandit debris will be no factor.
- The SF will not block between EF and bandit.
Missiles are preferred. Guns employment is last resort. The SF must immediately call their shot. No clearance is required, but restraint is expected. Directive calls to the EF are encouraged to enable a safe shot.
- SF: “1 BREAK LEFT”
- EF: “1, BREAKING”
- SF: “2, FOX 2…SPLASH, KILL BANDIT”
¶ Offensive Context
When offensive, shots of opportunity should be taken only when the above criteria are met. The Supporting Fighter (SF) employs to expedite the kill while avoiding fratricide or blocking the Engaged Fighter (EF). Restraint and clear communication are emphasized.
¶ Defensive Context
When defensive, survival has priority over geometry. If the Defensive Fighter (DF) is in or approaching the bandit’s WEZ, they should fire if able—even if the shot is less than ideal. The Supporting Fighter (SF) must avoid blocking the DF’s shot line while seeking their own opportunities to engage. Clear manuevering directive calls help ensure both fighters survive while denying the bandit follow-up attacks.
¶ Egress
Post-kill, the fighter with higher SA (likely the supporting fighter) will initiate egress with:
“[Wingman C/S], BUGOUT [Heading]”
Followed by:
“[Wingman C/S], VISUAL, [Direction/Distance/Altitude reference]”
The directed fighter responds VISUAL, and the element initiates egress and returns to standard flight contracts
It is likely that the egress direction will simply be the direction the flight came through to the operational area. It is also highly encouraged to request a picture update from AIC to get a GREEN [DIRECTION] call to help direct the flight to safety or to become apprised of other imminent threats.
¶ Defensive Gameplan
Response depends on range to MAR:
-
Far Game (outside WEZ/MAR):
Execute a staggered hook turn toward the hostile and employ. If unable to turn without crossing MAR, split and bracket. Flow toward each other to set up mutual shots. -
Near Game (inside MAR):
Drop the nose, descend, and use terrain to force a re-attack. Split to allow one fighter to go offensive. If already in WEZ (missile inbound), execute an immediate defensive maneuver and assign roles rapidly.
Key Maneuvers:
- Staggered Hook – offset hooks to generate angles.
- Opposing Hook Turn – simultaneous opposite turns to split threats.
- Cross Turn – both fighters cross into each other’s turn circles to bracket.
¶ Priorities
- C2 and FL are not in the cockpit with you.
- Double targeting is better than leaving a hostile unopposed.
- Always tell your flight if you are jumped.
- Priority is missiles downrange.
¶ ACM Exercises
When running these exercises, to get the basics down, it is recommended to limit the members to rear quarter IR missiles and AIM-7s only. Afterwards, you can expand to more capable missiles and adapt tactics.
¶ Offensive ACM
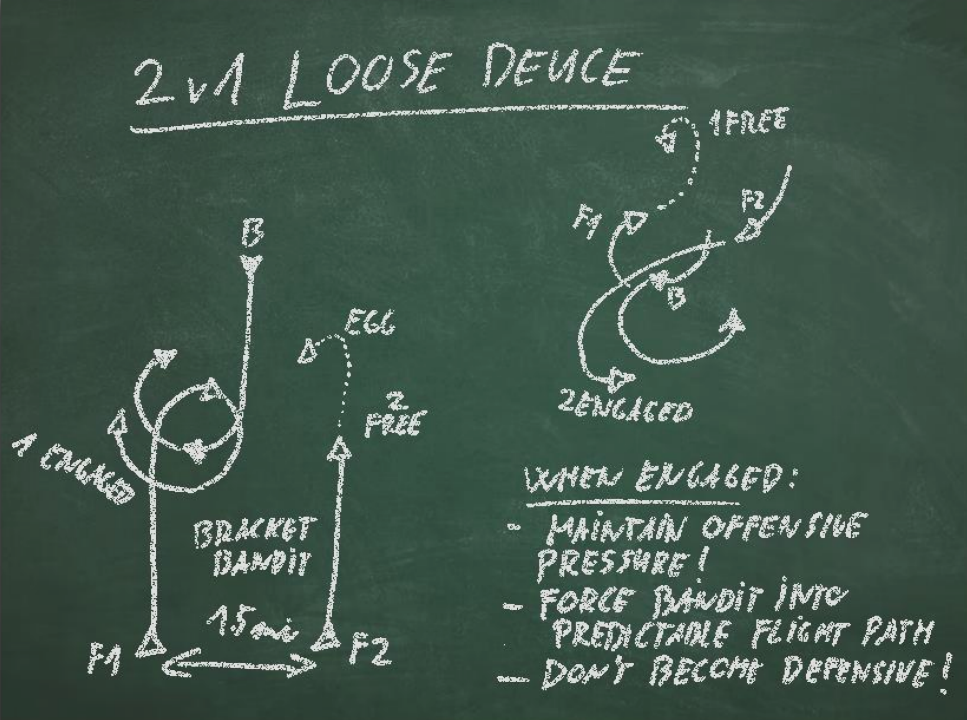
Setup for a run in on each other, 2v1, fighters in combat spread. The goal is bracketing the bandit, forcing him to pick a fighter and identifying engaged fighter, supporting fighter, and then maneuvering to the kill. Engaged fighter should try to kill the bandit or force him into a predictable flight for the supporting fighter.
¶ Defensive ACM
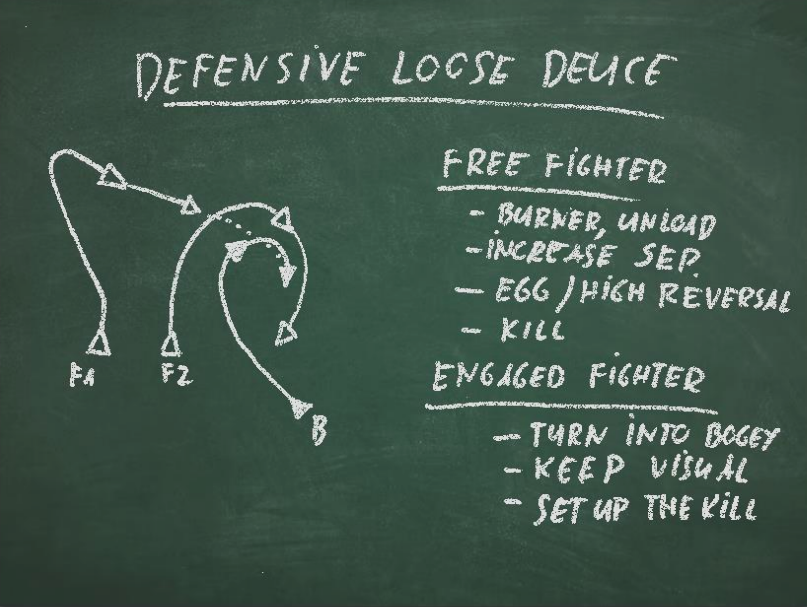
Setup fighters in combat spread. Bandit will pop up from below and behind outside the WEZ. Practice visual lookout and identify which fighter (closer) is engaged.
¶ 2v2 ACM
Setup fighters and bandits in combat spread, 20 mile run in. Fighters should bracket the bandits.
¶ 2vUnk
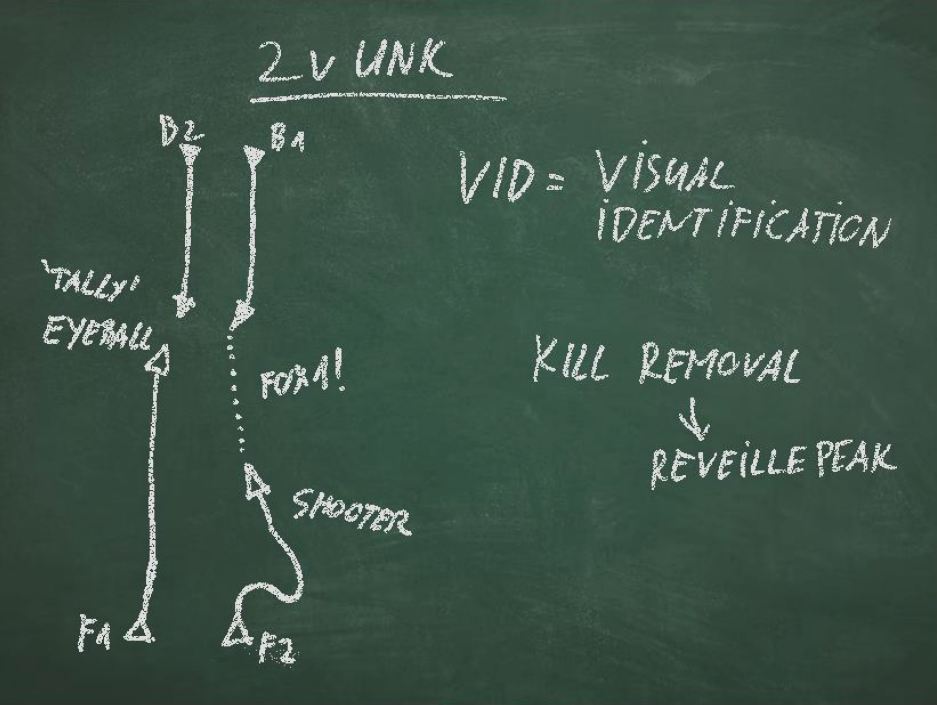
For a spicy setup where VID is necessary, you can take a page out of Vietnam’s playbook. Fighters are in combat spread, 50 mile run in. Bandits can snuggle up to conceal their true number and present a single welded wing, two-ship, etc. Fighters can elect to keep the section together, or run a classic “shooter-eyeball” where one fighter will select MAX throttle and attempt to merge and VID the bogeys, while the other fighter will employ BVR missiles to even the fight.
¶ 4vUnk
The previous example can be expanded to a division, allowing the practice to expand to splitting the division as necessary or using an entire section for shooter-eyeball.
¶ Tactical Intercepts
¶ Intercept Geometry
Intercept Geometry is a set of concepts that defines how two aircraft (the fighter, and the bandit) and their flight paths interact during an interception. The following diagrams will define these concepts and how they interact and interrelate to describe an intercept.
¶ Target Aspect, Bandit Flight Path, Slant Range, & Antenna Train Angle
¶ Antenna Train Angle & Target Aspect
¶ Generating Closure
¶ Command & Control (C2)
For official operations, a human Command & Control agency may be available to provide additional information and coordination for fighters. In the Air-to-Air mission, this will typically be specified as Air Intercept Control or AIC.
¶ Controller Check-in
Fighters will check in to their assigned controller by first ensuring all members of the flight are pushed to the controlling agency’s frequency, and then proceed to contact the controller using the following as a template:
[Controller’s Callsign], [Flight Lead’s Callsign], checking in, as fragged, request alpha check from Bullseye.
The fighters will request an ALPHA CHECK from the controller to verify that both the controller and the fighters agree on the Bullseye position. This will be given as the fighter’s current Bullseye position. This position should agree with the fighters within 5 NM, 5°, and 1,000 ft.
The controller will reply with the following:
[Flight Lead Callsign], [Controller’s Callsign], alpha check from Bullseye is XXX,YYY. Angels ZZ, Track A.
The controller will give the position as a magnetic bearing from the bullseye position to the aircraft in nautical miles, altitude in thousands of feet (angels), and direction of travel to the nearest sub-cardinal direction as a “Track” (e.g. North-East,)
If there are any discrepancies in the flight that differ from what is present in the Air Tasking Order, such as, a missing aircraft, faulty weapon system or communication system, report that to the controller as an exception. For example:
CLOSEOUT, INFERNO 61, checking in with exceptions. Request alpha check from Bullseye.
The controller will reply with an alpha check and then proceed to copy exceptions:
INFERNO 61, CLOSEOUT, Alpha check from Bullseye is 145, 85. Angels 18, Track North.
After verifying the alpha check, the controller will continue to copy exceptions:
INFERNO 61, CLOSEOUT, go with exceptions.
Flight leads should then list out any discrepancies they have to report:
CLOSEOUT, INFERNO 62 LINK BENT, INFERNO 63 GROUND ABORT
In this case the flight lead is reporting that Inferno 62 is unable to use Link 16/TNDL, and that Inferno 63 had to abort on the ground and is not in the air with the flight.
¶ Air Intercept Control Information
Controllers will utilize a standard format to communicate to fighters the location of a contact or group. This radio call will take the following structure:
[Group or Contact], [Location], [Altitude], [Aspect or Track], [Declaration], [Additional Descriptors]
¶ Contacts and Groups
| CONTACT | An individual radar return |
| GROUP | Any number of CONTACTs within 3 NM in azimuth and range of each other. |
¶ Control Formats
Control format defines how the location of a group will relayed to the fighters. There are 2 types of control formats:
¶ BRAA
BRAA is an acronym for Bearing, Range, Altitude, and Aspect. These are referenced from the fighter to the called contact.
| Bearing | The magnetic heading from the fighter to the called contact |
| Range | Distance in nautical miles from the fighter to the contact |
| Altitude | Measured to the nearest thousand feet, and given as Angels or Thousands depending on contact declaration |
| Aspect | Will be given as Hot, Flanking, Beaming, or Dragging |
The purpose of BRAA format is to give a specific fighter(s) faster situational awareness (SA) on a contact or group. BRAA format can be used with tactical or close control, but never in broadcast control.
¶ Bullseye
Bullseye format utilizes a common reference point, such as a specific coordinate or terrain feature, to relay contact/group information. Without accurate information on this common reference point, the information relayed is of little to no use.
Bullseye format will give the location as a magnetic bearing from the reference point to the contact or group, followed by the range and altitude. For Example:
BULLSEYE, 0 4 5 / 22, 18 THOUSAND
Bullseye format can be used with either broadcast or tactical control.
¶ Altitude
Altitude on a contact or group will be given in ANGELS or THOUSANDS depending on whether a group/contact is friendly or ambiguous, respectively.
¶ Track & Aspect
TRACK will indicate a direction of travel for a contact to the nearest sub-cardinal direction or use the magnetic bearing of the contact’s flight path.
ASPECT will be used to indicate a relative direction of travel from a referenced fighter.
¶ Declaration
This portion of the the standard radio call will inform fighters of the Rules of Engagement restrictions on the identified group or contact and can be summarized as follows:
| Hostile | A GROUP that meets the ROE criteria for engagement. Weapons release against this group is implicitly authorized |
| Bandit | A GROUP that is positively identified as an enemy, but does not meet ROE criteria for engagement. |
| Bogey | A GROUP whose identity is not known or confirmed. |
| White Air | A GROUP positively identified as a non-combatant. |
| Friendly | A GROUP that is positively identified as friendly. |
¶ Additional Descriptors
Controllers may append their call with amplifying information that may include group strength, contact make and model, airspeed, or maneuvers
| Heavy | Group Strength indicator, meaning a group contains 3 or more contacts |
| Fast | Speed of contact or group exceeds Mach 1.0 |
| Very Fast | Speed of contact is exceeds Mach 1.5 |
| Type | This descriptor will be followed by the contact or group’s NATO designator for the given aircraft type (e.g. FULCRUM) |
¶ Control Types
The control type forms a contract between the controller and the fighters. There are 3 types of control: Broadcast, Tactical, and Close control.
¶ Broadcast Control
Broadcast control is a method of communication that meant to be useful to all fighters on the network and will only utilize bullseye format to communicate information about groups. When in broadcast, information of a contact or group will not specify an aspect and instead relay an absolute direction of travel to the nearest sub-cardinal direction. For example:
Group, Bullseye 1 0 0 / 45, 22 Thousand, Track South-West
It is important to note, that when under broadcast control, no group or contact will be LABELED, and the controlling agency accepts responsibiity for all groups to be monitored.
¶ Tactical Control
Tactical control is communication directed towards a specific fighter, CAP station, division/flight, or section/element. Tactical control is initiated by fighters with the controller by initiating a COMMIT. Information on groups and contacts can remain in Bullseye format, or immediately transition to BRAA depending on the briefed contract between fighters and the controller. Tactical control also initiates the LABELING of a picture, and will switch from using TRACK to ASPECT when communicating a group’s direction.
Other fighters on the network can still use this information to build additional SA. An example of a controller in tactical control can be seen below:
Lead Group, Bullseye 0 7 5 / 55, 30 Thousand, Hot, Hostile, Heavy.
When under tactical control, the controlling agency (AIC) will only accept responsibilty for those groups not TARGETED by fighters and monitor their positions. It is the fighter’s responsibility, once TARGETED to maintain radar coverage of their group(s).
¶ Close Control
Close control is used when a controller must control individual fighters. Fighters should brief controllers on when/if they will require close control prior to mission start if able. During close control AIC may command a commit, target, or flow for fighters to adhere to.
Close control drains the AIC of SA on a larger picture and requires that their attention be focused on the fighters requiring control information.
¶ Picture & Labels
¶ The Picture
When contact and group information is compiled, it is referred to as a PICTURE. A controller will communicate to fighters the locations of all contacts and groups in their assigned area of responsibility. This list of contacts and groups is given in a bullseye format.
¶ Beyond Visual Range Combat
¶ Picture Range (PR)
Picture Range, or PR, is the ultimate range of the fighter’s mission, where contacts beyond the PR are considered No Factor. Within this range, AIC will be expected to include any contacts in their picture updates.
The focal point of the PICTURE from where to determine this range can be a geographical reference, the collective center of a package, the location of a CAP Fix, or the current location of the fighters. PR may be afixed to an option for a whole mission, or it may be fluid depending on the needs of a package. If there are multiple CAP Fixes, then there may be multiple PRs. Ultimately PR is an excercise for the AIC, with an agreement of understanding between the fighters that AIC is controlling.
¶ Commit
The Commit is a contract between C2 and fighters, where the fighters accepts responsibility to execute intercepts within a PICTURE. When fighters commits, they are agreeing to engage the whole PICTURE, although they are targeting a specific GROUP within the PICTURE.
A FL will choose to commit their flight to a PICTURE, when any GROUP within the PICTURE meets their Commit Criteria.
It is important for an FL to internalize that when they commit, they are committing to the PICTURE. The fate of that flight is ultimately sealed in their ability to successfully execute an intercept on every GROUP in the PICTURE, and anything less than an eventual Pk of 1.0 can lead to the complete destruction of their flight. Although a PICTURE may have a large Targeting Depth when they initially commit, this is almost guaranteed to rapidly change after the flight persecutes the first targeted GROUP within the PICTURE.
A commit is warranted if any one of the following cases is met:
-
AIC Directed Commit
- Commit when directed by AIC.
-
Mission Threat Commit
- Untargeted groups exist within a threat range to the mission, AND
- The flight can:
- Commit to the entire picture, OR
- Commit with the (pre-)planned assistance of other flights.
-
Self-Preservation Commit
- Untargeted groups pose a direct threat to self-preservation
- (airframe / missile dependent).
- Untargeted groups pose a direct threat to self-preservation
At the commit, flight leaders should immediately direct Master Arm ON, and decide upon engagement gameplan (Launch and Leave/Launch and Decide/etc.).
¶ Targeting Range
Targeting Range, or TR, is the maximum doctrinal range that the nearest hostile group in a picture can be from the fighters, before the fighters can accept responsiblity to target and engage groups within that picture. Before TR is met, DCA flights will stay on station on their CAP Fix, and OCA flights will maintain to their pre-briefed navigation plan.
¶ Factor Range (FR)
Factor Range, or FR, is a notional range from which fighters who merge with their targeted group can be engaged by a follow-on group. This can be approximated as the maximum WEZ of the expected threat and the projected range rate of closure, centered around the currently targeted group.
It is important to note, that FR is not necessarily applicable to Launch & Leave tactics, but always applicable to gameplans aiming to terminate in a merge.
¶ Decision Range (DR)
¶ Minimum Abort Range (MAR)
Minimum Abort Range or MAR, will be defined as the minimum range at which a fighter can execute a drag defense and kinematically defeat a threat missile without providing the opportunity/range to turn back into the threat. This range will make the following assumptions for an abort maneuver:
- 5G slice-back to turn cold
- ATA 30°-45°
- TA 0°-15°
¶ Minimum Out Range (MOR)
Minimum Out Range or MOR, will be defined as the minimum range at which fighters can execute a drag defense and remain outside of MAR
¶ Minimum Recommit Range (MRR)
Minimum Recommit Range, or MRR, will be defined as the minimum range at which fighters can turn back into a hot target, regain radar contact, and fire a missile by the MAR
¶ Intercept Timeline
The below phases typically have ranges associated with each, but those ranges are heavily dependent on airframe and missile capability as well as bandit missile capability. For example, when Tomcats with Pheonix missiles go up against R-27ER/SD-10 equipped fighters, their employment typically occurs at or before 55 miles, as opposed to the contrary, where employment typically occurs at ~40 miles.
¶ Pre-Commit
This stage usually starts with a picture call, either requested or already stated by the AIC. The dialogue shown will be between CLOSEOUT (AIC) and RIPPER1 (CAP Flight)
CLOSEOUT:
Closeout, PICTURE update, 3 groups
CLOSEOUT:First group, BULLS 315 for 10, 30 THOUSAND, TRACK SOUTH, STRENGTH UNKNOWN, BANDIT
CLOSEOUT:Second group, BULLS 045 for 10, 28 THOUSAND, TRACK SOUTH, STRENGTH UNKNOWN, BANDIT
The flight is still following pre-briefed sanitization settings and building situation awareness. The flight should strive to get as much of the PICTURE on their radar as possible.
¶ Commit
This stage occurs when the PICTURE meets commit criteria, and the flight begins the intercept
RIPPER11:
RIPPER1, COMMIT
The flight will check FENCE IN settings, depart their CAP route, and begin the intercept. Note, flights commit to a picture, not an individual group in a picture. Typically the formation changes to a combat spread at this time and the wingman will refrain from communication bar acknowledgements and information that can increase SA.
RIPPER11:
RIPPER1, CLOSEOUT, two groups, AZIMUTH 15 MILES, West Group, BULLS 315 for 10, 30 THOUSAND, HOT, HOSTILE. East Group, 28 THOUSAND, HOT, HOSTILE
The AIC will now label the picture, giving distinct names to each group, in this case West Group and East Group. The flight will correlate what their radars see, with the picture callout.
¶ Correlation
Typically, with the bullseye calls given, no communication is necessary, but if a flight wishes to confirm, they will use a DECLARE call.
RIPPER11:
CLOSEOUT, RIPPER1, contact BRAA 355 for 80, 30 THOUSAND, DECLARE
CLOSEOUT:RIPPER1, CLOSEOUT, contact is West Group, HOT, HOSTILE
¶ Targeting
Targeting is taking responsibility for a group or multiple groups within a picture. Specifically, TARGETED is an informative call about what group the flight is targeting, while TARGET is a directive call to target a group. This allows a flight to inform the AIC which groups they plan to engage.
RIPPER11:
RIPPER1, TARGETED, West and East Group
Deciding what group to target depends on a number of factors:
- Mission consideration (Is there a group that poses a higher risk to mission failure?)
- Range (Closest)
- Aspect (Hottest)
- Altitude (Highest)
- Known Threat
Should a group need to be released from targeting, the flight will use a DROPPING call
CLOSEOUT:
CLOSEOUT, RIPPER1, DROPPING East Group
RIPPER11:RIPPER1, CLOSEOUT, roger, MONITORING East Group
Factors to consider dropping a group depend upon the flights armament and capabilities, but typically involve the targeted group flowing cold or close to beaming at long range.
The flight leader should also determine a plan for the engagement, such as employment range, crank direction, and whether to execute Launch-and-Leave (Skate/Short Skate) or Launch-and-Decide (Banzai) tactics
¶ Melding
Meld signals the end of standard contract sanitization, and the flight will focus their radars on the targeted group (or groups, with each member focusing on their designated group by the flight leader).
RIPPER11:
RIPPER1, MELD, BRAA 355 for 80, 30 THOUSAND
All the flight members should now be looking at the targeted group(s) and can proceede to their sort plan
¶ Sorting
This phase assigns a target to each member of the flight, usually prescribed in a prebriefed contract like below:
| Azimuth | Range | Elevation | |
|---|---|---|---|
| Leader | Left | Lead | Low |
| Wingman | Right | Trail | High |
While this does not require a radio call to happen, the flight leader can direct it.
RIPPER11:
RIPPER1, SORT
RIPPER12:2, SORTED RIGHT
¶ Employment
This is the phase in which weapons come off the rail. The flight should fire and crank together. The crank should be pre-briefed or gone decided in the Targeting phase. The flight leader should “roll up” the shot calls onto the AIC channel.
RIPPER11:
1, FOX 3
RIPPER12:2, FOX 3
RIPPER11:FLIGHT, CRANK LEFT
RIPPER11:
RIPPER1, FOX 3 times TWO, West Group
While in the crank, the flight should assess the situation and determine whether to execute the engagement plan as briefed, or to audible. They should also be providing TIMEOUT calls when the missile reaches its intended target, SHOT TRASHED calls if the missile is defeated, and SPLASH calls if they can visually see impacts.
Should the flight decide to execute a BANZAI, the flight is committing to the merge with the targeted group(s). These situations are only advisable when the flight is numerically superior than the hostile group, and has good SA.
Otherwise, the flight should execute Launch-and-Leave tactics with a Skate or Short Skate. Never skate opposite the direction of the crank. The flight is still open to recommit at a later time should parameters improve or the situation call for it. Once this is complete, the flight should reset if they do not plan to recommit, and direct AIC to monitor the group again
RIPPER11:
CLOSEOUT, RIPPER1, RESET SOUTH, MONITOR West Group
¶ Air Combat Tactics
¶ Launch & Leave Tactics
¶ Skate
Skate is an abort maneuver at or before the Minimum Out Range (MOR)
¶ Short Skate
Short Skate is an abort maneuver at or before the Minimum Abort Range (MAR)
¶ Launch & Decide Tactics
¶ Banzai
Informative call to execute Launch-and-Decide tactics, committing the flight to the merge with their targeted group.
¶ Cold-Ops
¶ Section/Element
¶ Notchback
A Notchback is a maneuver executed within a 2-ship formation used to defeat an adversary that is outside decision range by splitting the section into two beaming aircraft as shown in the figure below:
The objective of this maneuver is to force the adversary to choose between the two fighters and commit to an attack. The “naked” fighter will then take this opportunity to initiate their own attack on the adversary. It is key to note that this tactic should only be used outside of decision range, in order to give fighters the ability to abort when spiked. If fighters have crossed past the decision range, and into the minimum abort range, a Stagger-Back may be the more likely ensure survivability.
¶ Stagger-Back
Like the Notchback, a Stagger-Back will split the formation into two seperate fighters for the adversary to target, while also reducing closure rate between fighters and the adversary. This tactic is best used when outside of the adversary stern WEZ in order to give fighters the required time and space to defend an incoming adversary missile when this tactic is initiated.
¶ Division/Flight
¶ Delousing
¶ Transition to WVR
¶ Abort and Reset
¶ Air to Air Mission & Execution
¶ Defensive Counter Air
Defensive Counter Air (DCA) missions consist of defending high value assets (airborne or ground based) or points of interest. These missions will be designed to detect, identify, intercept, and destroy or deny enemy forces attempting to attack or penetrate the friendly air environment.
Planning considerations should include, but are not limited to: Rules of Engagement (ROE), point vs. area defense, mobility of the defended asset, type, number, and origin of enemy forces, availability of friendly assets, time of day, and weather conditions.
Typical DCA missions include
- Barrier Combat Air Patrol (BARCAP) - Defense of an area with the intent of preventing hostile aircraft past a designated line or position.
- High Value Airborne Asset Protection or CAP (HVAAP/HVAACAP) - Defense of a specific high value asset such as an E-2D, E-3A, Tanker aircraft, or other asset.
- RESCAP - A CAP established in support of rescue operations or Tactical Recovery of Aircraft or Personnel (TRAP) missions.
- Point Defense
- Area Defense
DCA missions may require integration with surface based air defenses such as Patriot or AEGIS to provide adequate coverage of friendly forces. This integration requires the designation of Fighter Engagement Zones (FEZ), Joint Engagement Zones (JEZ), and Missile Engagement Zones (MEZ).
¶ Combat Air Patrol
Combat Air Patrol(s) (CAP) are designed to place an element or flight in a fixed position with the ability to place sensors and weapons at the most likely direction of the threat.
A CAP station is a racetrack orbit that can be defined by 5 attributes:
1. CAP Fix
This will be the point most forward in the CAP orbit with a radial direction from this point indicating the Hot direction. A CAP fix can be any given point with an advantageous position to defend from, but can also be a briefed navigational aid, such as a TACAN or VOR, or a geographic reference (GeoRef) such as a landmark or terrain feature. The CAP Fix is always on the side of the orbit closest to the expected threat vector.
2. Hot Leg
This will be the portion of the CAP orbit where fighters will be pointed towards the threat sector and are expected to conduct radar sanitization of their assigned sectors by means of their briefed radar mating plan. Visual lookout doctrine should be respected, and not neglected. The hot leg will usually be defined by the magnetic bearing the fighters will be facing when on this portion of the orbit.
3. Cold Leg
This portion of the orbit will position fighters facing away from the expected threat and should be utilized to focus on visual lookout in support of the Hot fighters while continuing radar sanitization. Like the hot leg, this portion of the orbit will be defined by the magnetic bearing the fighters will be facing.
4. Leg Length
Leg lengths will vary, but are essential to define in a CAP plan, with shorter lengths requiring higher tempo, workload, and situational awareness, but allowing fighters to remain in a smaller geographic area. Longer legs will allow more radar frames per leg and a lower workload per pilot, while expanding the geographic footprint of the CAP station. Lengths can be defined in either distance (NM) or in time (MM:SS). The primary factor affecting leg length will be how much Opportunity Range fighters are willing to cede to the adversary.
5. Altitude
Altitude will also play a key factor in fighters’ ability to detect, identify, and prosecute low altitude threats, and also heavily impact their endurance, and missile employment range. Flight Leads and planners should be cognizant of how the selected altitude will impact these factors and choose the appropriate block based on the expected threats and assets to be defended.
The intent of this orbit is to always have an element of fighters on the Hot Leg, facing the threat axis, while remaining in a fixed airspace with adequate radar and visual coverage of the threat axis and defended assets.
¶ Offensive Counter Air
Offensive Counter Air (OCA) missions are operations conducted with the intent to destroy, disrupt, or neutralized enemy aircraft, missiles, launch platforms, and their supporting assets and systems before and after launch. These include attack operations, fighter sweeps, escort, and suppression or destruction of enemy air defenses (SEAD/DEAD). OCA missions are not confined to air-to-air combat, and encompass all missions undertaken to disable airfields, aircraft, or their supporting systems. Specific fighter missions may include:
- Fighter Sweep
- Escort
- Close Escort
- SEAD
- Strike
¶ Fighter Sweep
Fighter Sweeps are missions conducted with the intent to engage enemy aircraft ahead of a strike package and should attempt to stimulate enemy interceptors to engage in aerial combat. This may be desired to attrite enemy forces or divert them away from another attack by friendly forces. Fighters conducting these missions should exercise looser commit criteria, and exploit their ability to maneuver freely without friendly forces in close proximity.
When fighter sweeps are utilized in conjunction with other fighters as part of a package, the fighters should position themselves well ahead of the package by either physically displacing themselves in distance or by time. Utilizing distance, fighters should be 2-3 multiples of their briefed shoot range per the expected threat. If utilizing time, fighters should arrive with enough time to conduct 2-3 complete BVR engagements before strikers arrive at their initial point or launch point for stand-off weapons. The time required to accomplish 1 BVR engagement can be summarized in the following formula:
(CRNLT - MAR) / (VC/60) = Time in minutes
- CRNLT - No Later Than Commit Range, will be measured in Nautical Miles (NM) defined as the minimum range for fighters to commit to a group
- MAR - Minimum Abort Range, will be measured in NM and can vary between threat aircraft/missile system
- Vc - Closure Rate will be measured in Knots and will be defined as the average closure rate between fighters and the targeted group
The above formula will approximate the amount of time required to close the distance from the commit to the minimum abort range, and can be utilized to approximate the time required for fighters to detect, target, and employ on a group and remain outside of the expected threat Weapons Employment Zone (WEZ). It is important to note that this is only an approximation of an ideal timeline, and not always reflective of the inconsistencies that can arise due to poor detection, PID or ROE requirements, or poor sorting by fighters.
The total number of hostile aircraft expected will impact the amount of required fighters utilized in the sweep. If a 100% Probability of Kill (Pk) is desired from the fighter sweep, planners should expect each hostile aircraft to require 2-3 Fox 3 missiles, when utilizing Launch and Leave (LL) tactics, and expect to bring the required number of munitions to destroy or suppress the expected number of hostile aircraft.
For example: an airfield is known to house 4 fighters ready to scramble, and is known to keep 2 aircraft in a CAP that defends an area that strike aircraft will need to penetrate. The total number of expected hostile aircraft is 6 total, and a 100% Pk is desired, this will require 12-18 Fox 3 in order for a fighter sweep to have enough munitions to destroy or suppress the expected threat.
¶ Fighter Escort
An escort mission should notionally remain approximately 1 BVR timeline ahead of its defended asset, or far enough to deny adversaries a WEZ on the asset(s).
An escort mission should exercise tighter commit criteria, and be wary of being dragged from their defended asset in order to remain mission effective.
¶ Close Escort
Close Escort missions are a subset of fighter escort with much more restrictive commit criteria, and tighter spacing to their defended asset. Notionally, a close escort will have visual contact with their asset, along with means to defend from in-close or pop-up threats.